Overview
1. Quick Reference: Core Tasks at a Glance
FaithConnector provides two separate login portals depending on the type of work you need to do. As church staff, you will spend ~90% of your time in the Admin Site for weekly news and events, and only occasionally open the Flex Editor for permanent page copy or staff changes.
Primary Day-to-Day Dashboard (~90% of Tasks)
🏢 The Admin Site
Form-based dashboard for managing weekly church content. Fill in dates, text, and files, then click Save:
- Weekly Announcements:
Content → Announcements
- Calendar & Events:
Content → Calendar
- Sermons & Audio Uploads:
Content → Downloads
- Contact Inquiries & Messages:
Content → Contact Form Inquiries
- Custom Forms & Sign-Ups:
Content → Custom Forms
- Prayer Requests:
Content → Prayer Requests
- People & Giving:
Management → People & Online Giving
Occasional On-Page Tweaks (~10% of Tasks)
✏️ The Flex Visual Editor
On-page visual editor for editing permanent static pages. Browse the site and click text to edit like a Word document:
- Staff Directory: Update names, bios, titles, or photos on
/about/our-staff
- Page Text Changes: Edit wording on static pages like What We Believe or Our Story
- Cloning Elements: Duplicate an existing staff card or info block
- Tip: Routine weekly news and events should always be posted via the Admin Site, not the Flex Editor.
| What You Want to Do |
Which Portal |
Where to Go |
What the Website Does for You |
| Post Weekly Announcements |
Admin Site |
Content → Announcements |
Formats as clean cards with images; automatically hides them when expired. |
| Add Calendar Events |
Admin Site |
Content → Calendar |
Puts items on the calendar and shows the next 3 on the homepage with date badges. |
| Upload Sermons & Audio |
Admin Site |
Content → Downloads |
Organizes sermons into clean media cards with one-click play buttons. |
| View Form Inquiries & Messages |
Admin Site |
Content → Contact Form Inquiries |
Read messages and inquiries submitted through website forms. |
| View Prayer Requests |
Admin Site |
Content → Prayer Requests |
Review and manage prayer requests submitted online. |
| Edit Page Text & Links |
Flex Editor |
Browse to page & click text to type |
Formats automatically in clean brand typography with generous paragraph spacing. |
| Update Staff Directory |
Flex Editor |
Our Staff page (click photo/text) |
Frames photos in 130px circles and styles titles in warm church gold. |
| Update Committees PDF Button |
Admin + Flex |
Content → File Library, then Our Staff |
Upload PDF in File Library, copy URL, then update button link in Flex Editor. |
| Master Code Box (Global CSS) |
Admin Site |
Settings → Global Page Settings (Header Code) |
Leave this box alone! It holds the design rules for the whole website. |
| Website Traffic & Reports |
Looker Studio |
Website Analytics (#9) ↗ |
Live dashboard for page traffic, sermon plays, visitor devices, and automated quarterly reports. |
Best Practices
2. Why We Use Announcement Cards (Instead of Flyer Pictures)
In the past, church announcements were often posted as pictures of paper flyers on the homepage. Here is why the new card system is so much better for our congregation:
- Easy to read on phones: No pinching or zooming required. Text flows naturally onto any screen size.
- Clickable links: Web links, donation forms, and email addresses can be tapped directly.
- Accessible for all visitors: Screen readers used by people with visual impairments can read card text, but cannot read words trapped inside pictures.
- Automatic clean-up: Setting an expiration date ensures that when an event passes, the card quietly disappears without anyone having to remember to delete it!
Step-by-Step
3. How to Post an Announcement
The homepage automatically displays the 3 most recent active announcements in attractive cards.
- Log in to your FaithConnector Admin Site at lynnhurstucc.org/admin.
- In the left menu, click Content → Announcements.
- Click the green + Add button.
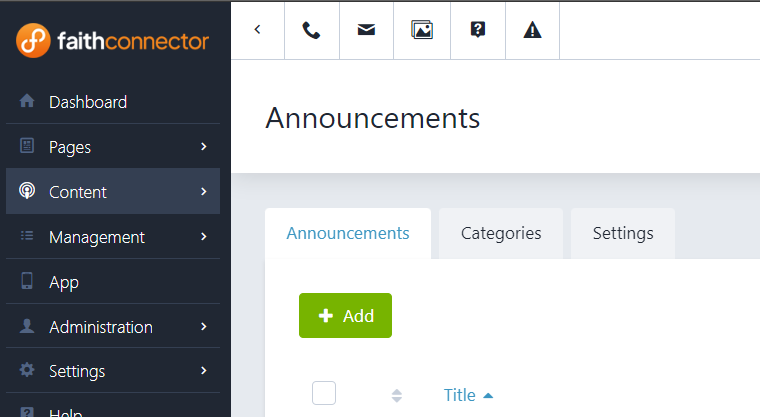
Click to Enlarge: Finding the Announcements Screen
Shows the FaithConnector left sidebar and green + Add button
Important Fields to Fill In:
- Title: A clear, engaging headline (e.g. "Sunday School Kickoff!" or "Mission Committee Meeting").
- Category: Select 'Announcements'.
- Start Date: The announcement will begin displaying on and after this date.
- Start Time: Sets what time the announcement appears. (The website scheduler runs every 15 minutes, so updates publish on the quarter hour).
- Expire Date (Optional): The announcement will not be displayed after this date. If left empty, the announcement will display until you either delete it or enter an Expire Date. (Best Practice: Setting an Expire Date for the day after an event keeps the homepage clean and current automatically).
- Announcement: Type details, contact emails, or sign-up links.
- Image / Thumbnail (Recommended): Upload a photo or flyer graphic. The website automatically crops and fits it into the card header.
- Priority (Optional): Defaults to 10. Controls the display order—lower numbers appear closer to the top of the list (e.g., set to 1 if you want to pin an urgent announcement to the very top).
Helpful Options (At the Bottom):
For standard weekly announcements, you can leave these checkboxes untouched. When needed, here is what each does:
- Emergency Announcement: Pins and highlights urgent notices (such as severe weather cancellations or building closures).
- Add Announcement to Calendar: Automatically creates a matching calendar entry so you don't have to enter it twice.
- Hidden / Deactivated: Saves the announcement in your admin panel without publishing it to the live site (helpful for drafting).
- Exclude From Search: Hides the announcement from website search results.
- Automatically Post to Facebook: Cross-posts the announcement directly to the church Facebook page if connected.
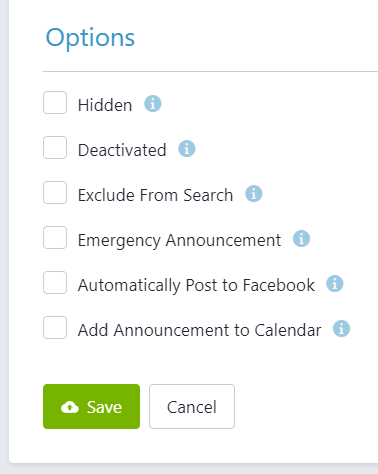
Click to Enlarge: Announcement Options & Save Buttons
Shows the bottom checkboxes (Emergency, Add to Calendar, Hidden) and Save button
Step-by-Step
4. How Upcoming Events Work (Calendar Feed)
The homepage has a dedicated Upcoming Events section directly below the announcements.
- 100% Automated: You do not need to edit the homepage. It automatically displays the next 3 events pulled live from the church calendar.
- Date Badges: Each event gets a crisp white date badge (e.g.,
OCT 15) overlaid on the image, showing the start time and location.
How to Add an Event:
- Go to the Admin Site (lynnhurstucc.org/admin) → Content → Calendar.
- Click + Add (or + Add Event).
- Fill in the title, date, start time, location (e.g. Sanctuary, Social Hall, or Fellowship Room), and a short summary.
- Click Save. The event will instantly show on the calendar and in the homepage upcoming events feed!
📸
Click to View: Live Upcoming Events Cards
See how event dates and thumbnail photos display automatically
Navigation
5. What Happened to the Old 3-Column Homepage Box?
The old homepage had a cramped 3-column box cramming weekly notes, raw sermon links, and events into tiny text columns.
In our redesigned site, these functions have their own beautiful, dedicated spaces:
- Weekly Notes & Welcome Info: Highlighted in the large Explore Our Community buttons and the New Here? page.
- Upcoming Events: Handled by the modern Upcoming Events Cards.
- Sermons & Worship Recordings: Featured in the dedicated Listen to Sermons video portal (
/sermons), with instant one-click playback.
Flex Visual Editor
6. How to Edit Regular Page Text
When you need to make occasional wording changes on permanent pages (like "What We Believe", "Our Story", or "Faith Formation"), log into the Flex Visual Editor at lynnhurstucc.org/edit:
- Visual Mode: Navigate to the page you want to update, click directly into the text box, and type just like editing a Word document or email.
- Never click the
<> Source button: You do not need to touch or view code.
- Paragraph Spacing: Press Enter once between paragraphs. The styling engine automatically applies generous, readable spacing.
- Weekly Routine Reminder: For routine weekly news, events, and sermon audio, use the Admin Site instead of the Flex Editor.
Flex Visual Editor
7. Managing the Staff Directory
The Meet Our Staff page (/staff) displays portraits inside neat 130px circles with warm gold titles. Staff updates are done in the Flex Visual Editor at lynnhurstucc.org/edit.
To Update an Existing Staff Member:
- Log into the Flex Visual Editor (lynnhurstucc.org/edit) and browse to the Our Staff page.
- Click directly on the bio, title, or photo you want to change.
- Type the new wording or upload a new photo.
- Click Save.
To Add a New Staff Member:
- In the Flex Editor on the Staff page, hover over an existing staff card.
- Click the Duplicate / Clone icon (looks like two overlapping squares).
- Replace the name, job title, email, and portrait photo.
- Drag the card into your desired order and click Save.
How to Update the Ministry Committees PDF Button:
On the Our Staff page, there is a navy pill button linking to the annual Lynnhurst UCC Ministry Committees PDF. When a new committee year begins, follow these two steps to update the file and button link:
Step 1: Upload the New File in the Admin Site
- Log into the Admin Site (lynnhurstucc.org/admin).
- Navigate to Content → File Library → Church Documents → [Current Year] (e.g. 2026).
- Upload your new committees PDF file.
- Click Copy URL next to the uploaded document to copy its web link to your clipboard.
Step 2: Update the Button in the Flex Visual Editor
- Log into the Flex Visual Editor (lynnhurstucc.org/edit) and browse to the Our Staff page (
/about/our-staff).
- Hover over the Lynnhurst UCC Ministry Committees button and click the Edit icon (pencil).
- Change the year in the button text if needed (e.g., change 2026–2027 to 2027–2028).
- Click Source in the editor toolbar. (Note: Normally you never need to view source code, but this button is the exception because the document link is embedded inside the button code).
- Find the URL inside
window.open('...', '_blank') in the source code, and replace it with your copied link.
- Click Save (or OK).
💡 Button Source Code Reference
Inside the Source view, the button code looks like this (replace the highlighted link and year):
<div style="text-align: center; padding: 24px 20px; width: 100%; box-sizing: border-box;">
  <button onclick="window.open('https://faithconnector.s3.amazonaws.com/6278/files/church_documents/2026/committees2026_27.pdf', '_blank')" style="background-color: #002681; color: #ffffff !important; border: 2px solid #002681; font-family: 'Inter', system-ui, sans-serif; font-size: 0.95rem; font-weight: 700; letter-spacing: 0.5px; padding: 15px 34px; border-radius: 9999px; cursor: pointer; box-shadow: 0 4px 16px rgba(0, 38, 129, 0.25); display: inline-flex; align-items: center; justify-content: center; gap: 10px; transition: all 0.2s ease;" type="button">
    <span style="font-size: 1.1rem;">📄</span> Lynnhurst UCC Ministry Committees 2026–2027
  </button>
</div>
📸
Click to View: Cloning a Staff Card in Visual Editor
See where the duplicate icon appears on hover
Safety Rules
8. Site Safety Rule: The Master Code Box
⚠️ Hands Off: Global Page Settings Header Code Box
In the Admin Site under Settings → Global Page Settings → Custom Code → Header, there is a large box of master code (production-global.css).
This code controls the colors, navigation menus, and automated card layouts across every page of the website. Please never edit, re-type, or delete anything inside this box.
📸
Click to View: What the Global Page Settings Code Box Looks Like
Visual reference of Settings → Global Page Settings to leave untouched
Analytics
9. Website & Ministry Engagement Analytics
We have connected a real-time Google Looker Studio dashboard to track how visitors find and engage with the church website. This gives church leadership and staff transparent, real-time insight into online ministry reach.
Live Reporting Dashboard
📊 Real-Time Looker Studio Report
Interactive dashboard pulling live data from Google Analytics (GA4) and Google Search Console.
Open Live Dashboard in New Tab
↗
Automated Schedule
🗓️ Quarterly Digest Schedule
A comprehensive PDF snapshot report is automatically compiled and emailed to church.office@lynnhurstucc.org on the first day of every quarter:
- Q1: January 1st
- Q2: April 1st
- Q3: July 1st
- Q4: October 1st (Started 10/1)
What This Report Tracks:
- Visitor Trends: Total weekly and monthly church website visitors and page impressions.
- Most Popular Pages: See which ministries, worship info, ensembles, and staff profiles attract the most attention.
- Sermon & Media Plays: How many times sermon audio recordings and downloads are accessed.
- Device & Geographic Reach: Percentage of mobile vs. computer visitors and regional Twin Cities reach.
Support
10. Need Help or Custom Work?
If you ever need a brand-new page layout, custom form, or technical adjustment, please contact: